Difference between revisions of "Tutorial:Mun Landing"
(Bold + Italics) |
m (→Constructing a Mun Rocket) |
||
| (19 intermediate revisions by 12 users not shown) | |||
| Line 5: | Line 5: | ||
==Constructing a Mun Rocket== | ==Constructing a Mun Rocket== | ||
| − | The kind of rocket that can get you to the Mun and back can be very, very heavy. | + | The kind of rocket that can get you to the Mun and back can be very, very heavy. The ideal sequence for a Mun rocket is 3-4 stages (though more or less are certainly possible). |
Let's start from the top down: | Let's start from the top down: | ||
| Line 11: | Line 11: | ||
[[File:Lander.png|thumb|150px|A typical Munar lander.]] | [[File:Lander.png|thumb|150px|A typical Munar lander.]] | ||
| − | * The '''Upper Stage (Lander)''' should be deployed in Munar orbit, and should be capable of traveling to the surface of the Mun, back to orbit, back to [[Kerbin]] orbit, and down into Kerbin's atmosphere. Sounds like a lot, but since most of this occurs in a region with a small gravity well and no atmosphere, it [http://i.imgur.com/FkgzQ.png doesn't require much]. A couple fuel tanks, a parachute, and at least one light thruster should do it (note that landing legs, RCS, and | + | * The '''Upper Stage (Lander)''' should be deployed in Munar orbit, and should be capable of traveling to the surface of the Mun, back to orbit, back to [[Kerbin]] orbit, and down into Kerbin's atmosphere. Sounds like a lot, but since most of this occurs in a region with a small gravity well and no atmosphere, it [http://i.imgur.com/FkgzQ.png doesn't require much]. A couple fuel tanks, a parachute, and at least one light thruster, like the poodle engine, should do it. However, you won’t need as much of delta V for robotic landing. For a small lander, the Ant engine would be enough. (note that landing legs, RCS, and SAS are recommended, but not necessary). |
Note: It is possible to split this into two stages, 1 for the descent, and 1 for the return home. This is only recommended for heavier, more advanced landers. | Note: It is possible to split this into two stages, 1 for the descent, and 1 for the return home. This is only recommended for heavier, more advanced landers. | ||
| Line 25: | Line 25: | ||
Note: Depending on your preference, you may split this into two stages or more. More advanced players may want to incorporate detachable fuel tanks to save weight. | Note: Depending on your preference, you may split this into two stages or more. More advanced players may want to incorporate detachable fuel tanks to save weight. | ||
| − | + | *Safety check: Go to delta V section (click on it). drag the altitude bar to say 30 KM. If your delta V here is BELOW 7.5K, you need to get more. 8.5K is recommended for beginners, and 8K is considered quite safe if you had went there for more than once. | |
| + | |||
| + | ==Another design== | ||
| + | Put a robomax Rockomax X200-16 Fuel Tank and a Rockomax X200-32 Fuel Tank for the first stage, stick on a RE-I5 "Skipper" Liquid Fuel Engine, then put four TT-38K Radial Decouplers on the exterior with an FL-T800 Fuel Tank on each with a reliant engine on each with a nose cone. The second stage is a LV-TX87 "Bobcat" Liquid Fuel Engine with two FL-TX900 Fuel Tanks then make a lander with a payload fairing around it and a MechJeb module. then follow other instructions. | ||
==Step 1 - Launching Into Kerbin's Orbit== | ==Step 1 - Launching Into Kerbin's Orbit== | ||
| + | I will advise you that you get a drink of water next to you, because this may cause a lot of stress when doing so and a nice drink of water will cool you down. | ||
| + | |||
Same as any standard launch, presumably on a much larger scale. Read the tutorial for [[Tutorial: How to Get into Orbit|how to reach orbit]] if you haven't already figured it out. | Same as any standard launch, presumably on a much larger scale. Read the tutorial for [[Tutorial: How to Get into Orbit|how to reach orbit]] if you haven't already figured it out. | ||
| − | *At around | + | *At around 100 m/s begin to tilt your craft '''east'''(to the right, with the orange line pointing down). We are going for a flat, stable, counterclockwise equatorial orbit (same as the Mun). |
| − | |||
*Try to circularize your orbit around 150,000 m, though any orbit above the atmosphere (70,000 m) is fine. Going any higher than this is not recommended because circularizing a wide orbit just to reach the Mun would waste more fuel. | *Try to circularize your orbit around 150,000 m, though any orbit above the atmosphere (70,000 m) is fine. Going any higher than this is not recommended because circularizing a wide orbit just to reach the Mun would waste more fuel. | ||
| Line 40: | Line 44: | ||
To transfer from Kerbin's orbit, you will want your Apoapsis to intersect the Mun's orbit. | To transfer from Kerbin's orbit, you will want your Apoapsis to intersect the Mun's orbit. | ||
| − | *If you want to reach the Mun on the first swing around, '''wait until | + | *If you want to reach the Mun on the first swing around, '''wait until Mun rises just above the horizon'''. A good rule of thumb is for each 100 km you are above [[Kerbin]], wait another 2 seconds. Once it does, begin a forward burn, and keep an eye on your map, as the apoapsis moves out towards Munar orbit. It can also be thought of as: If the Mun is 12:00, your rocket should be at 4:00. Hopefully if you've done this right, you will be captured by Munar gravity on the first pass. |
*If you are, for some reason, not caught by the Mun, just make sure that your apoapsis intersects the Mun's orbit. When you reach the apoapsis, perform another forward burn to widen your path on the Mun's orbit (but do not circularize!). This will give you a better chance of hitting the Mun, and you can just wait (or timewarp) until you do. | *If you are, for some reason, not caught by the Mun, just make sure that your apoapsis intersects the Mun's orbit. When you reach the apoapsis, perform another forward burn to widen your path on the Mun's orbit (but do not circularize!). This will give you a better chance of hitting the Mun, and you can just wait (or timewarp) until you do. | ||
| + | |||
| + | *Or, play around with maneuver nodes (if you had unlocked them). Set the prograde vector to about 850m/s, then use the small plus/add buttons to add waiting orbits (if required). Play around until you find a intercept you preferred (no need to pause game, you are in orbit!) | ||
==Step 3 - Munar Orbit== | ==Step 3 - Munar Orbit== | ||
| − | *When you enter the Mun's sphere of influence, turn your craft around and apply retro thrust. Keep it going until you are below escape velocity and are orbiting around the Mun. Otherwise, you will return to Kerbin's gravity well or, worse, fly into orbit around [[Kerbol]]. | + | *When you enter the Mun's sphere of influence, turn your craft around and apply retro thrust. Keep it going until you are below escape velocity and are orbiting around the Mun. Otherwise, you will return to Kerbin's gravity well or, worse, fly into orbit around [[Kerbol]] or even slam right into the Mun itself (unless an impacter was your plan, in which case, carry on). |
*Because the Mun's gravity is substantially weaker than Kerbin, your orbital velocity will not be very high. Aim for a nice, circular orbit at an altitude no higher than 200,000 m. Because there is no atmosphere, you do not have to worry about drag at any altitude. | *Because the Mun's gravity is substantially weaker than Kerbin, your orbital velocity will not be very high. Aim for a nice, circular orbit at an altitude no higher than 200,000 m. Because there is no atmosphere, you do not have to worry about drag at any altitude. | ||
| Line 66: | Line 72: | ||
*If you are confident in your landing skills, aim for a flat surface to reduce complications during landing/takeoff. Typically the best place to find these spots is either on top of a hill, or at the bottom of a crater. | *If you are confident in your landing skills, aim for a flat surface to reduce complications during landing/takeoff. Typically the best place to find these spots is either on top of a hill, or at the bottom of a crater. | ||
| − | *Gently touch down at 6 m/s with as little horizontal velocity as possible. | + | *Gently touch down at 6 m/s with as little horizontal velocity as possible. Maybe you want to toggle your SAS into Retrograde Mode to kill your horizontal velocity. (Only some support Retrograde Mode. A whole list can be found [[SAS#SAS_capabilities|here]].) |
Congratulations! You've landed on the Mun. Take your Kerbal(s) out for an EVA so they can stretch their legs, jet around, and plant a flag! | Congratulations! You've landed on the Mun. Take your Kerbal(s) out for an EVA so they can stretch their legs, jet around, and plant a flag! | ||
| Line 107: | Line 113: | ||
==See also== | ==See also== | ||
| + | * [[Tutorial:Mun For Dummies|Mun For Dummies: Travelling to the Mun and Back]] by nicnacnic (For Version 1.0 to 1.2) | ||
* [[Tutorial:Moon landing using mods]] | * [[Tutorial:Moon landing using mods]] | ||
* [[Tutorials]] | * [[Tutorials]] | ||
| − | [[Category:Tutorials| | + | |
| + | {{Tutorials}} | ||
| + | [[Category:Tutorials|Mun Landing]] | ||
Latest revision as of 10:28, 9 February 2022
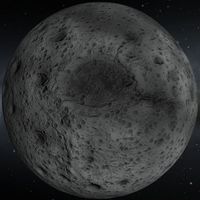
This tutorial will show you how to land a Kerbal on The Mun.
Contents
Constructing a Mun Rocket
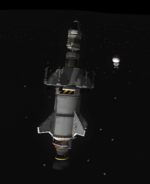
The kind of rocket that can get you to the Mun and back can be very, very heavy. The ideal sequence for a Mun rocket is 3-4 stages (though more or less are certainly possible).
Let's start from the top down:
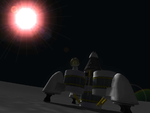
- The Upper Stage (Lander) should be deployed in Munar orbit, and should be capable of traveling to the surface of the Mun, back to orbit, back to Kerbin orbit, and down into Kerbin's atmosphere. Sounds like a lot, but since most of this occurs in a region with a small gravity well and no atmosphere, it doesn't require much. A couple fuel tanks, a parachute, and at least one light thruster, like the poodle engine, should do it. However, you won’t need as much of delta V for robotic landing. For a small lander, the Ant engine would be enough. (note that landing legs, RCS, and SAS are recommended, but not necessary).
Note: It is possible to split this into two stages, 1 for the descent, and 1 for the return home. This is only recommended for heavier, more advanced landers.
- The Middle Stage (Transfer Burn) should be run from just before/during Kerbin orbit, and should end during/after Munar orbit. Depending on how effective your first stage is, this stage should not require much more fuel than the upper stage.
Note: It is also possible to incorporate this stage with the landing stage, though it is not recommended.
- The Lower Stage (Launch) Should be big enough to haul everything above it into (or at least close to) orbit above Kerbin. While not required, it is recommended that this stage incorporate some detachable Solid Rocket Boosters (SRBs). This is the stage where you want to pack as much stuff as you can to get to orbit, because you aren't taking it with you. If your Middle stage is powerful enough, you may be able to use this stage to get halfway into orbit, and use the Middle stage to complete the orbit, like the Saturn V.
Note: Depending on your preference, you may split this into two stages or more. More advanced players may want to incorporate detachable fuel tanks to save weight.
- Safety check: Go to delta V section (click on it). drag the altitude bar to say 30 KM. If your delta V here is BELOW 7.5K, you need to get more. 8.5K is recommended for beginners, and 8K is considered quite safe if you had went there for more than once.
Another design
Put a robomax Rockomax X200-16 Fuel Tank and a Rockomax X200-32 Fuel Tank for the first stage, stick on a RE-I5 "Skipper" Liquid Fuel Engine, then put four TT-38K Radial Decouplers on the exterior with an FL-T800 Fuel Tank on each with a reliant engine on each with a nose cone. The second stage is a LV-TX87 "Bobcat" Liquid Fuel Engine with two FL-TX900 Fuel Tanks then make a lander with a payload fairing around it and a MechJeb module. then follow other instructions.
Step 1 - Launching Into Kerbin's Orbit
I will advise you that you get a drink of water next to you, because this may cause a lot of stress when doing so and a nice drink of water will cool you down.
Same as any standard launch, presumably on a much larger scale. Read the tutorial for how to reach orbit if you haven't already figured it out.
- At around 100 m/s begin to tilt your craft east(to the right, with the orange line pointing down). We are going for a flat, stable, counterclockwise equatorial orbit (same as the Mun).
- Try to circularize your orbit around 150,000 m, though any orbit above the atmosphere (70,000 m) is fine. Going any higher than this is not recommended because circularizing a wide orbit just to reach the Mun would waste more fuel.
Ideally, you do not want to ditch your first stage until you have achieved orbit. If your rocket isn't capable of reaching orbit on the first stage, try adding some detachable fuel tanks.
Step 2 - To The Mun
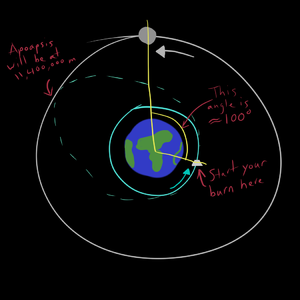
To transfer from Kerbin's orbit, you will want your Apoapsis to intersect the Mun's orbit.
- If you want to reach the Mun on the first swing around, wait until Mun rises just above the horizon. A good rule of thumb is for each 100 km you are above Kerbin, wait another 2 seconds. Once it does, begin a forward burn, and keep an eye on your map, as the apoapsis moves out towards Munar orbit. It can also be thought of as: If the Mun is 12:00, your rocket should be at 4:00. Hopefully if you've done this right, you will be captured by Munar gravity on the first pass.
- If you are, for some reason, not caught by the Mun, just make sure that your apoapsis intersects the Mun's orbit. When you reach the apoapsis, perform another forward burn to widen your path on the Mun's orbit (but do not circularize!). This will give you a better chance of hitting the Mun, and you can just wait (or timewarp) until you do.
- Or, play around with maneuver nodes (if you had unlocked them). Set the prograde vector to about 850m/s, then use the small plus/add buttons to add waiting orbits (if required). Play around until you find a intercept you preferred (no need to pause game, you are in orbit!)
Step 3 - Munar Orbit
- When you enter the Mun's sphere of influence, turn your craft around and apply retro thrust. Keep it going until you are below escape velocity and are orbiting around the Mun. Otherwise, you will return to Kerbin's gravity well or, worse, fly into orbit around Kerbol or even slam right into the Mun itself (unless an impacter was your plan, in which case, carry on).
- Because the Mun's gravity is substantially weaker than Kerbin, your orbital velocity will not be very high. Aim for a nice, circular orbit at an altitude no higher than 200,000 m. Because there is no atmosphere, you do not have to worry about drag at any altitude.
Step 4 - Landing On The Mun
Select your landing site along your orbital trajectory. If you want Kerbin to remain visible from your landing site, select a location along your trajectory on the near side of The Mun. Wait until you are about to pass over it.
- Once you are above it, kill your horizontal velocity until the yellow marker sits at the top of the Navball.
- Eject any stages beneath the lander if you haven't already done so.
- Begin a slow, vertical descent. Do not tip your lander over!! Keep an eye on that yellow circle with the X in it on your navball, and stay pointed at that.
- At 50,000 m begin to reduce your velocity. It should probably not be any higher than 300–400 m/s at this point. When you reach 10,000 m, reduce your velocity to below 100 m/s.
- At 2,000 m altitude, you should reduce to your final descent velocity of 6–12 m/s. Any higher and you risk damaging the lander (and killing/stranding your brave astronaut on the Mun). Get your landing gear down if you haven't already done so.
- If you are confident in your landing skills, aim for a flat surface to reduce complications during landing/takeoff. Typically the best place to find these spots is either on top of a hill, or at the bottom of a crater.
- Gently touch down at 6 m/s with as little horizontal velocity as possible. Maybe you want to toggle your SAS into Retrograde Mode to kill your horizontal velocity. (Only some support Retrograde Mode. A whole list can be found here.)
Congratulations! You've landed on the Mun. Take your Kerbal(s) out for an EVA so they can stretch their legs, jet around, and plant a flag!
Step 5 - Returning To Orbit
Getting from the Mun back to Kerbin is, fortunately, much easier. Before you attempt to do so, make sure that you have enough fuel for the return trip. If not, consider a rescue mission with a better-designed rocket.
- Begin a slow vertical burn headed east, and try to get a low, circular, equatorial Munar orbit. You do not need a lot of thrust for this.
- Aim for an apoapsis around 200,000 m, and when you reach it apply forward thrust to circularize your orbit.
Step 6 - Back To Kerbin
- To get back to Kerbin the easiest way (as suggested by Scott Manley) is to burn prograde at the point in your orbit where you're moving opposite to the direction the Mun is going in its orbit around Kerbin. If you are orbiting around the Mun in the same direction as the Mun is around Kerbin, then burn prograde when you are between Mun and Kerbin, otherwise you need to burn prograde on the far side of the Mun.
- The effect of this maneuver is increasing your speed relative to the Mun but reduce your speed relative to Kerbin as you are burning in opposite direction to movement of the Mun around Kerbin. This helps to easily get a Kerbin orbit with a the lowest point of orbit (periapsis) close to Kerbin. Can be counter-intuitive if you need to burn on the Kerbin side, as your Mun apoapsis will initially head away from Kerbin, don't worry about this and keep burning until the Mun apoapsis exits its sphere of influence.
- Burn until you have a Kerbin orbit trajectory in the map view with a Kerbin periapsis below 20 km. This height or lower will guarantee you will reenter the atmosphere in one orbit.
Step 7 - Landing On Kerbin
- When you get nearer to Kerbin you can adjust your landing point if you like. Maybe try aiming for somewhere close to the KSC. If you are in Career mode, you get rewarded with more money salvaged the closer you land to KSC, but it's not easy! Don't bother in Sandbox or Science mode - it's not necessary.
- If you are worried about coming in too fast, aim for a very shallow descent to aerobrake and bleed some of that extra velocity off.
Assuming you included a parachute in your design, and it isn't ripped off, congratulations on your first successful Munshot.
Other Ideas
Establish a permanent settlement on the Mun.
See also
- Mun For Dummies: Travelling to the Mun and Back by nicnacnic (For Version 1.0 to 1.2)
- Tutorial:Moon landing using mods
- Tutorials
| |||||||||||||||||||||||||||||||||||


