Difference between revisions of "Setting up Visual Studio"
From Kerbal Space Program Wiki
Joshuadery (talk | contribs) m (Fixed link to badly named page) |
(Suggest VS2013 Community edition, latest version of KSP.) |
||
| Line 7: | Line 7: | ||
* Microsoft Windows XP or above | * Microsoft Windows XP or above | ||
* Microsoft .NET Framework 3.5 or above | * Microsoft .NET Framework 3.5 or above | ||
| − | * For Windows 7 or 8 [http://www. | + | * For Windows 7 or 8 [http://www.visualstudio.com/en-us/products/visual-studio-community-vs Visual Studio Community 2013] or for Windows XP [http://www.microsoft.com/visualstudio/en-us/products/2010-editions/visual-csharp-express Microsoft Visual C# Express 2010] |
| − | ** You can also use Visual Studio 2012 (2010 for XP), which is functionally similar. | + | ** You can also use Visual Studio 2012 or 2013 (2010 for XP), which is functionally similar. |
| − | * Kerbal Space Program | + | * Latest version of Kerbal Space Program. |
== Setting Up == | == Setting Up == | ||
# Close any solutions you currently have open by choosing '''File > Close Solution'''. | # Close any solutions you currently have open by choosing '''File > Close Solution'''. | ||
| − | # Start a new solution either by selecting New Project from the Home screen, or by using '''File > New... > Project...''' | + | # Start a new solution either by selecting '''New Project''' from the Home screen, or by using '''File > New... > Project...''' |
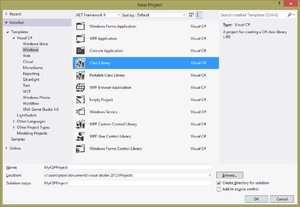
# Create a new Class Library project for C#. Name it whatever you like. (We're using MyKSPProject for this tutorial, so replace MyKSPProject with whatever you're using.) [[File:VS2012-NewClassLib.png|thumb|right|Setting up the class library project]] | # Create a new Class Library project for C#. Name it whatever you like. (We're using MyKSPProject for this tutorial, so replace MyKSPProject with whatever you're using.) [[File:VS2012-NewClassLib.png|thumb|right|Setting up the class library project]] | ||
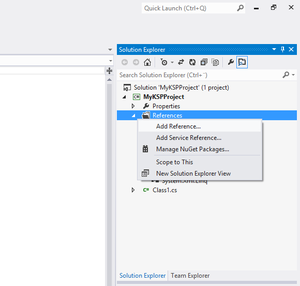
# In your Solution Explorer (the pane on the top right of the screen), right-click on MyKSPProject and choose Add Reference.[[File:VS2012-AddRef.png|thumb|right|Adding references]] | # In your Solution Explorer (the pane on the top right of the screen), right-click on MyKSPProject and choose Add Reference.[[File:VS2012-AddRef.png|thumb|right|Adding references]] | ||
Revision as of 20:47, 20 January 2015
Microsoft Visual Studio is a program (more specifically IDE, or Integrated Development Environment) that makes it easier to code applications for Windows. For KSP, it is used for developing part modules via the C# IDE, although any program that can compile C# is sufficient.
Prerequisites
In order to complete this tutorial you must have the following. Plugins may be written in other environments.
- Microsoft Windows XP or above
- Microsoft .NET Framework 3.5 or above
- For Windows 7 or 8 Visual Studio Community 2013 or for Windows XP Microsoft Visual C# Express 2010
- You can also use Visual Studio 2012 or 2013 (2010 for XP), which is functionally similar.
- Latest version of Kerbal Space Program.
Setting Up
- Close any solutions you currently have open by choosing File > Close Solution.
- Start a new solution either by selecting New Project from the Home screen, or by using File > New... > Project...
- Create a new Class Library project for C#. Name it whatever you like. (We're using MyKSPProject for this tutorial, so replace MyKSPProject with whatever you're using.)
- In your Solution Explorer (the pane on the top right of the screen), right-click on MyKSPProject and choose Add Reference.
- Switch to the Browse tab.
- Find and add the following DLLs as references:
- KSP_INSTALL_FOLDER\KSP_Data\Managed\Assembly-CSharp.dll
- KSP_INSTALL_FOLDER\KSP_Data\Managed\UnityEngine.dll
- Save your solution.
- In your Solution Explorer (the pane on the top right of the screen), right-click on MyKSPProject and choose Properties. Change the Target Framework to 3.5 (Visual Studio will default to a newer framework version). Visual Studio will reload the project after you click ok.
Great, you're all set! Now continue to creating your first module!

