Setting up Visual Studio
From Kerbal Space Program Wiki
Revision as of 08:10, 10 October 2014 by NathanKell (talk | contribs)
Microsoft Visual Studio is a program (more specifically IDE, or Integrated Development Environment) that makes it easier to code applications for Windows. For KSP, it is used for developing part modules via the C# IDE, although any program that can compile C# is sufficient.
Prerequisites
In order to complete this tutorial you must have the following. Plugins may be written in other environments.
- Microsoft Windows XP or above
- Microsoft .NET Framework 3.5 or above
- For Windows 7 or 8 Visual Studio Express 2012 for Windows Desktop or for Windows XP Microsoft Visual C# Express 2010
- You can also use Visual Studio 2012 (2010 for XP), which is functionally similar.
- Kerbal Space Program 0.14 X1 or above.
Setting Up
- Close any solutions you currently have open by choosing File > Close Solution.
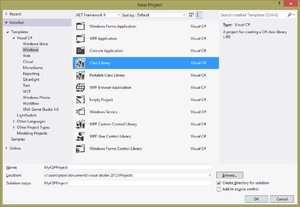
- Start a new solution either by selecting New Project from the Home screen, or by using File > New... > Project...
- Create a new Class Library project for C#. Name it whatever you like. (We're using MyKSPProject for this tutorial, so replace MyKSPProject with whatever you're using.)
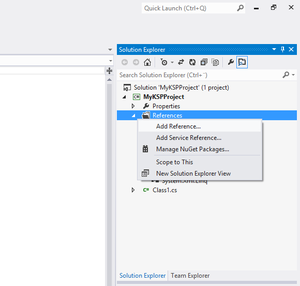
- In your Solution Explorer (the pane on the top right of the screen), right-click on MyKSPProject and choose Add Reference.
- Switch to the Browse tab.
- Find and add the following DLLs as references:
- KSP_INSTALL_FOLDER\KSP_Data\Managed\Assembly-CSharp.dll
- KSP_INSTALL_FOLDER\KSP_Data\Managed\UnityEngine.dll
- Save your solution.
- In your Solution Explorer (the pane on the top right of the screen), right-click on MyKSPProject and choose Properties. Change the Target Framework to 3.5 (Visual Studio will default to a newer framework version). Visual Studio will reload the project after you click ok.
Great, you're all set! Now continue to creating your first module!

