Kerbal to Pro: Modelling in 3ds Max
Contents
Kerbal To Pro: Modelling with 3ds Max 2014 for Kerbal Space Program
By Bilsta1000 (talk) (work in progress if not immediately apparent)
Contents
Chapter 1: Acquisition
Chapter 2: Familiarisation
Chapter 3: Creation
Acquisition
If you’re a student then you can download free versions and get free licences for Max, Maya and any of the Autodesk suite.
All you have to do is register at http://students.autodesk.com/ and scan or take a photo of your student card.
In this tutorial I'll be working with 3ds Max 2014
Familiarisation
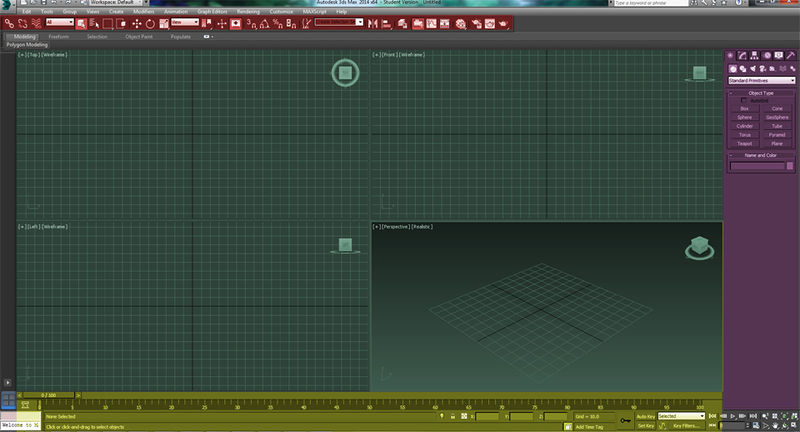
Max can be very intimidating on first launch, especially if you've never used it before. So first we will get used to where everything is.
Viewports
First you have your viewports (green) where your model will sit whilst you edit it. Any of the views can be edited if for example you'd like a textured view in one and a flat wireframe in another. It's your Max, Have it your way.
It's also possible to maximize one of these views so that it takes up the whole screen by pressing ALT + W
By default navigating this view is done with the mouse, here are some very useful notes on navigation alone.
- Left mouse button - Select
- CTRL + Left mouse button - Add to selection (Also works with click and drag)
- ALT + Left mouse button - Remove from selection (Also works with click and drag)
- Middle Mouse button (Click the scroll wheel) - Pan around view
- CTRL + Middle mouse button - Pan around view faster
- ALT + Middle mouse button - Orbit around view
- CTRL + ALT + Middle mouse button - Zoom in and out
- Right mouse button - Context menu
- CTRL + Right mouse button - Quick access menu (New objects and transforms)
- SHIFT + Right mouse button - Quick access menu (options)
- ALT + Right mouse button - Quick access menu (pivot point options)
Toolbars
The toolbars (red) contain the controls you need to manipulate your models. from left to right (default) they go
- Select and link - use for parenting
- Unlink Selection - use for unparenting
- Bind to spacewarp - (Never used it myself)*
- Selection filter - when selecting an object, you can only select what's in this box.
- Select object - Select objects using your mouse
- Select by name - Opens a window where you can select an object by name, Usefull if you have a lot of parts to your model.
- Selection region (hold) - With this you can change how you click and drag to select objects.
- Window/Crossing - Which parts are included in your selection
- If set to Crossing, whilst clicking and dragging, if any part of the geometry is dragged over it will be included in the selection.
- If set to Window, whilst clicking and dragging, the entire part needs to be inside the bounding box for it to be included in the selection.
- Select and Move - Select an object and moves it around (Shortcut: CTRL + W)
- Select and Rotate - Select an object and rotate it around (Shortcut: CTRL + E)
- Select and Scale - Select an object and scale it up or down. (Shortcut: Ctrl + R)
- Refference coordinate system - This changes the orientation of your transform gizmo for when you manipulate your objects.
- View - The default, The gizmo will be paralell with the viewports grid.
- Screen - The gizmo will be paralell with your computer monitor
- World - Usually the same as the viewport unless you have changed the orientation of your grid.
- Parent - (Never used it)
- Local - (Never used it)
- Gimbal - (Never used it)
- Grid - The gizmo will be paralell with the grid.
- Working - (Never used it)
- Pick - (Never used it)
- Change pivot point - This has quick options to move your pivot point around, Bear in mind you can move your pivot point anywhere you want by using the Heirachy panel.
- Use Pivot Point Center - This is the default location or where you have moved it using the Heirachy Panel
- Use Bounding Box Center - This moves your pivot point to the center of the bounding box.
- Use Transform Coordinate Center - Moves your pivot point to (0,0,0)
These are most of the tools you'll need, I find it easier to relax my left hand on the W + E + R keys which then makes "Move" my ring finger, "Rotate" my middle and "Scale" my index.
The Panels
Usually found on the right hand side of the screen, the panels window (Purple) is used for any creation or editing to your model.
It has six sections.
- Create - Add something to your scene
- Modify - Modify something in your scene.
- Heirachy - Modify any parenting or scene options such as the Pivot Point
- Motion - Used for Mocap and controlled animation.
- Display - Used to show and hide parts of your scene.
- Utilities - Helpfull little scripts.
I will go into more detail into certain sections of this as and when we need them as there is way too much to cover.
The Timeline
This will be covered in the animation section, for basic modelling you don't need this.
