Difference between revisions of "Tutorial:Create custom flags!"
(Removed both notices as I don't believe they still apply. Added a disclaimer section and fixed a broken link.) |
|||
| (2 intermediate revisions by the same user not shown) | |||
| Line 1: | Line 1: | ||
| − | + | == Disclamer == | |
| − | + | Although changes have been made to any inaccurate or broken sections, this tutorial was still written many years ago and may not reflect best practices. | |
| − | |||
| − | |||
| − | |||
| + | == Intro == | ||
Creating custom [[Flag (Image)|flags]] is simple; It's all about sizing and placing the file in the right area. For this demonstration I shall be using paint.net to customise my flag, but you may use any art tool you feel comfortable with, like [http://gimp.org GIMP] (all OS), [http://firealpaca.com/ FireAlpaca] (Windows, MacOS X), [http://getpaint.net paint.net] (Windows) or PaintToolSAI (Windows). Microsoft Paint isn't recommended but it works too. | Creating custom [[Flag (Image)|flags]] is simple; It's all about sizing and placing the file in the right area. For this demonstration I shall be using paint.net to customise my flag, but you may use any art tool you feel comfortable with, like [http://gimp.org GIMP] (all OS), [http://firealpaca.com/ FireAlpaca] (Windows, MacOS X), [http://getpaint.net paint.net] (Windows) or PaintToolSAI (Windows). Microsoft Paint isn't recommended but it works too. | ||
| Line 17: | Line 15: | ||
Assuming you are using a program with layering enabled, change the white to transparent (on Paint.net you can do this by using the magic wand on the white and pressing delete). You should then create a new layer and make it white; set this layer below the previous layer. You may then color this white layer to match the logo/photo you want to put over it. | Assuming you are using a program with layering enabled, change the white to transparent (on Paint.net you can do this by using the magic wand on the white and pressing delete). You should then create a new layer and make it white; set this layer below the previous layer. You may then color this white layer to match the logo/photo you want to put over it. | ||
| − | Going to the logo you wish to add, find the center. If its dimensions are indivisible by two (e.g. 1, 3, 5, 109, etc.) then stretch the image by one pixel in either direction, if it is divisible by two then great! You're half way there! Now, insert it over the design. You may need to scale it as the flag is rather small in comparison to most logos. For my example I am using a photo of a corgi. | + | Going to the logo you wish to add, find the center. If its dimensions are indivisible by two (e.g. 1, 3, 5, 109, etc.) then stretch the image by one pixel in either direction, if it is divisible by two then great! You're half way there! Now, insert it over the design. You may need to scale it as the flag is rather small in comparison to most logos. For my example I am using a photo of a corgi. (Please note that the example photo is scaled for an older version of the game. It is being kept in the article because it is cute) |
On the subject of the corgi photo: it is an obscure shape! If you are in the same predicament as me then you should consider taking color samples from the center before placing a dot, using that to line it up, and then adding the color back in its place. | On the subject of the corgi photo: it is an obscure shape! If you are in the same predicament as me then you should consider taking color samples from the center before placing a dot, using that to line it up, and then adding the color back in its place. | ||
| Line 28: | Line 26: | ||
==The Lazy Option== | ==The Lazy Option== | ||
| − | In the event that you have sucky drawing software, have an unsteady hand, or are just generally lazy, you can always download an image online - provided it has a width-to-height ratio of around | + | In the event that you have sucky drawing software, have an unsteady hand, or are just generally lazy, you can always download an image online - provided it has a width-to-height ratio of around 2:1, of course - use a website such as [http://picresize.com PicResize] to scale it down (hopefully down) to a ratio of 2:1, and then just proceed with Stage Three. This is a great method if you want to add high-quality flags. Alternatively, you can always use a hybrid method and draw it yourself at a high resolution for good quality, then work through the rescaling and insertion. |
[[Category:Tutorials|Create custom flags!]] | [[Category:Tutorials|Create custom flags!]] | ||
Latest revision as of 19:11, 22 July 2023
Contents
Disclamer
Although changes have been made to any inaccurate or broken sections, this tutorial was still written many years ago and may not reflect best practices.
Intro
Creating custom flags is simple; It's all about sizing and placing the file in the right area. For this demonstration I shall be using paint.net to customise my flag, but you may use any art tool you feel comfortable with, like GIMP (all OS), FireAlpaca (Windows, MacOS X), paint.net (Windows) or PaintToolSAI (Windows). Microsoft Paint isn't recommended but it works too.
Stage one: Design stage!
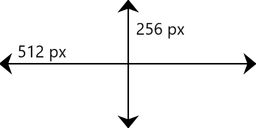
Alright, first you will need a blank canvas with the ratio (2:1). We are going to make a canvas with the resolution 512x256 in this tutorial as all the default flags are this size. You may then find the center by using the selection tool to place a dot on the 256th pixel from the left and the 128th pixel from the top. Repeating this from all four corners (or assuming you were accurate and placing the rest of the dots relative to the first), you should be left with a 2x2 mark on the flag. You may also download the file on the next stage.
Stage two: Inserting the design
At this point you have two options: Draw the design straight on or attach a logo. If you wish to draw it straight on; great! You can do that and skip ahead to Stage Three, if not: Read on!
Assuming you are using a program with layering enabled, change the white to transparent (on Paint.net you can do this by using the magic wand on the white and pressing delete). You should then create a new layer and make it white; set this layer below the previous layer. You may then color this white layer to match the logo/photo you want to put over it.
Going to the logo you wish to add, find the center. If its dimensions are indivisible by two (e.g. 1, 3, 5, 109, etc.) then stretch the image by one pixel in either direction, if it is divisible by two then great! You're half way there! Now, insert it over the design. You may need to scale it as the flag is rather small in comparison to most logos. For my example I am using a photo of a corgi. (Please note that the example photo is scaled for an older version of the game. It is being kept in the article because it is cute)
On the subject of the corgi photo: it is an obscure shape! If you are in the same predicament as me then you should consider taking color samples from the center before placing a dot, using that to line it up, and then adding the color back in its place.
Stage Three: Inserting the flag to your KSP directory!
This is the part that lets you actually use the flag! Huzzah! First, you must save your image as a PNG. Next, you must go to your KSP root directory!
Find the folder named GameData, inside the root directory, and open it. Inside create a folder and name it, this will be your custom mod's folder. Open this also and create a folder called Flags. Finally, open this folder and move the custom flag into this folder. Congratulations! It is now available to use in your Kerbal Space Program experience! Plant the flag on the Mun, plant it on Kerbol! Plant it on Jool! Plant it on its self! Hit it with a rocket! Put it into orbit!(Little known fact: flags have physics enabled! You can rocket propel a flag into orbit if you plant it just right!) But make sure that whatever you do, you don't kill Jeb. Until next time, have fun with your flags!
The Lazy Option
In the event that you have sucky drawing software, have an unsteady hand, or are just generally lazy, you can always download an image online - provided it has a width-to-height ratio of around 2:1, of course - use a website such as PicResize to scale it down (hopefully down) to a ratio of 2:1, and then just proceed with Stage Three. This is a great method if you want to add high-quality flags. Alternatively, you can always use a hybrid method and draw it yourself at a high resolution for good quality, then work through the rescaling and insertion.


