Difference between revisions of "Tutorial:RemoteTech2"
(→Antennae and links) |
(→Relay Satellites) |
||
| Line 21: | Line 21: | ||
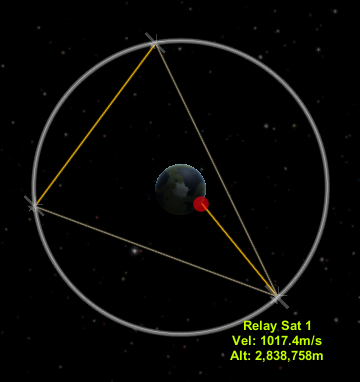
Launch your first satellite over the KSC, remembering to set up a link to the Mission Control. Launch your second satellite to the same altitude at a different angle, and then set one of its DTS-M1s linked to Mission Control, and the second to your first relay satellite. Switch to your first relay satellite and set one of its DTS-M1s to link to your second satellite. Then launch your third satellite, place it in an orbit to make a triangle with the first two and link it with the other two satellites and mission control (The easiest way to get the position right is to burn until your apoapsis is at keosynchronous altitude, then almost burn your periapsis to keosynchronous altitude but not quite. Your satellite will orbit slightly faster and move ahead of your other two satellites. When you're happy with its position, finish the burn to circularise your orbit). Congratulations, you've made your first set of relay satellites! Hopefully they now look something like this in the Tracking Station: | Launch your first satellite over the KSC, remembering to set up a link to the Mission Control. Launch your second satellite to the same altitude at a different angle, and then set one of its DTS-M1s linked to Mission Control, and the second to your first relay satellite. Switch to your first relay satellite and set one of its DTS-M1s to link to your second satellite. Then launch your third satellite, place it in an orbit to make a triangle with the first two and link it with the other two satellites and mission control (The easiest way to get the position right is to burn until your apoapsis is at keosynchronous altitude, then almost burn your periapsis to keosynchronous altitude but not quite. Your satellite will orbit slightly faster and move ahead of your other two satellites. When you're happy with its position, finish the burn to circularise your orbit). Congratulations, you've made your first set of relay satellites! Hopefully they now look something like this in the Tracking Station: | ||
| + | |||
[[File:RT2-first-relay-sats.png]] | [[File:RT2-first-relay-sats.png]] | ||
==Next Steps== | ==Next Steps== | ||
Now that you've got your first set of satellites equipped with KR-7s, you can control any probe in the kerbin sphere of influence. Equip any probe with 3 KR-7s. Before launch, switch to your relays, point one of their KR-7s at your probe and point the probe's 3 KR-7s at the relay satellites. Despite their appearance, KR-7s don't need to be physically faced towards the receiver. You should be well set to send a probe to the Mun. There are still two places your communications network can't reach, and that's directly behind the Mun and Minmus, so make sure you plan your route so you don't need to make a burn when behind them. If you want to solve this problem you can launch a further set of satellites out to beyond the Mun and Minmus' orbit, which will allow you to bounce a signal out and back behind them. Note that once you start bouncing a signal out to 60Mm and back the signal delay will start becoming noticeable. This won't usually be a problem when doing basic orbital burns, but may make finer operations like docking and landing tricky. | Now that you've got your first set of satellites equipped with KR-7s, you can control any probe in the kerbin sphere of influence. Equip any probe with 3 KR-7s. Before launch, switch to your relays, point one of their KR-7s at your probe and point the probe's 3 KR-7s at the relay satellites. Despite their appearance, KR-7s don't need to be physically faced towards the receiver. You should be well set to send a probe to the Mun. There are still two places your communications network can't reach, and that's directly behind the Mun and Minmus, so make sure you plan your route so you don't need to make a burn when behind them. If you want to solve this problem you can launch a further set of satellites out to beyond the Mun and Minmus' orbit, which will allow you to bounce a signal out and back behind them. Note that once you start bouncing a signal out to 60Mm and back the signal delay will start becoming noticeable. This won't usually be a problem when doing basic orbital burns, but may make finer operations like docking and landing tricky. | ||
Revision as of 02:07, 18 February 2014
RemoteTech 2 is a mod for KSP that modifies how unmanned probes work. Specifically, any unmanned probe must have a control link back to the KSC (or to a command ship, more on them later), requiring you to set up a satellite network to maintain links with your probes. RemoteTech 2 also simulates communications delay when giving commands to probes - while pottering around Kerbin this is merely irritating at around half a second, but interplanetary missions are seriously complicated by the several minute delays, necessitating the use of remotely executed commands.
This tutorial will assume you're playing in career mode. If playing in sandbox, you'll likely find it considerably easier, since the more powerful components will be available immediately.
Antennae and links
There are 3 types of antenna - omnidirectional, dish and command. Omnidirectional antennae can broadcast to any other antenna in range, but they typically have limited range compared to dishes. Dishes must be targeted at a receiver to work. Any link must be bidirectional and have unbroken line of sight to work. To keep control over a probe you must keep it connected to Mission Control, either directly or by being connected via other satellites.
First Steps
The first antenna you'll get is the Reflectron DP-10 that's unlocked at the same time as the Stayputnik probe core. The Reflectron is omnidirectional, is on by default (meaning you can control your probe on the launch pad) but only has a range of 500km. This means you'll only be able to control a probe with one of these until shortly before it goes over the horizon, even in a low orbit. You'll still want one on each probe, but to do much useful you'll need to at least unlock your second antenna...
The second antenna you'll unlock is the Comms DTS-M1. This has 100 times the range of the DP-10 and can just about reach Minmus, but is a dish antenna, so it must be aimed at the KSC to work. The other problem is that unlike the DP-10 the DTS-M1 is fragile, so it will shear off if deployed while traveling through the atmosphere, so you'll need to wait until you're in space before deploying it.
So, the DTS-M1 has the range to reach the Mun, so we're ready to go right? Unfortunately not. The KSC is only on one side of Kerbin, so when your probe is on the other side, it will lose its link with the KSC and you'll lose control of it. Only being able to control your probe half the time will be very problematic, so our first step is to set up a small set of satellites to bounce your signal from the KSC around Kerbin.
Relay Satellites
For this you'll at least need the Flight Control and Science Tech topics unlocked. The Electrics topic is also extremely useful, because it unlocks basic solar panels, which will be far superior to stuffing your satellites with batteries, which will still run down quite quickly powering several antennae. On the plus side, this will also unlock the Reflectron KR-7 dish, which has even more range than the DTS-M1 and isn't as fragile, so you can switch it on on the launch pad.
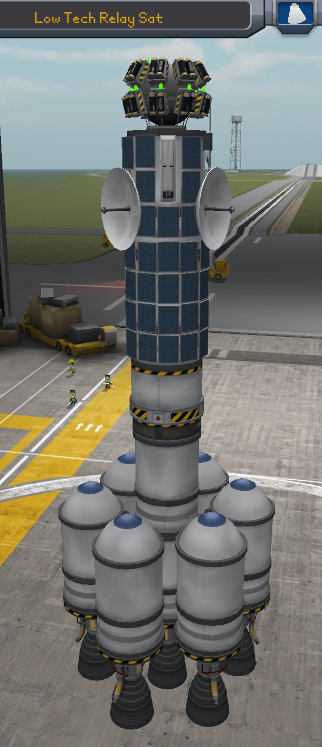
Note the single DP-10, 3 DTS-M1s and 3 3 KR-7s. This rocket will just about reach keosynchronous orbit with a well executed exit from the atmosphere, though a lower orbit will do. The important thing is to get the satellites at matching altitudes, otherwise they'll drift relative to each other.
Launch your first satellite over the KSC, remembering to set up a link to the Mission Control. Launch your second satellite to the same altitude at a different angle, and then set one of its DTS-M1s linked to Mission Control, and the second to your first relay satellite. Switch to your first relay satellite and set one of its DTS-M1s to link to your second satellite. Then launch your third satellite, place it in an orbit to make a triangle with the first two and link it with the other two satellites and mission control (The easiest way to get the position right is to burn until your apoapsis is at keosynchronous altitude, then almost burn your periapsis to keosynchronous altitude but not quite. Your satellite will orbit slightly faster and move ahead of your other two satellites. When you're happy with its position, finish the burn to circularise your orbit). Congratulations, you've made your first set of relay satellites! Hopefully they now look something like this in the Tracking Station:
Next Steps
Now that you've got your first set of satellites equipped with KR-7s, you can control any probe in the kerbin sphere of influence. Equip any probe with 3 KR-7s. Before launch, switch to your relays, point one of their KR-7s at your probe and point the probe's 3 KR-7s at the relay satellites. Despite their appearance, KR-7s don't need to be physically faced towards the receiver. You should be well set to send a probe to the Mun. There are still two places your communications network can't reach, and that's directly behind the Mun and Minmus, so make sure you plan your route so you don't need to make a burn when behind them. If you want to solve this problem you can launch a further set of satellites out to beyond the Mun and Minmus' orbit, which will allow you to bounce a signal out and back behind them. Note that once you start bouncing a signal out to 60Mm and back the signal delay will start becoming noticeable. This won't usually be a problem when doing basic orbital burns, but may make finer operations like docking and landing tricky.

