Difference between revisions of "Rover"
(Removed reference to Fine Print, stock now has survey comtracts) |
(→Navigation: Added some information about how the actual heading can still be estimated when the command module points up) |
||
| Line 37: | Line 37: | ||
== Navigation == | == Navigation == | ||
{|style="float:right" | {|style="float:right" | ||
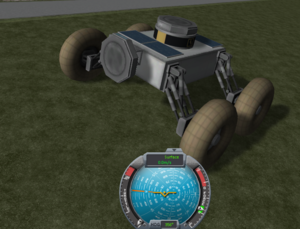
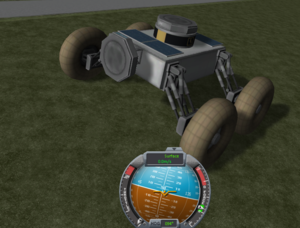
| − | | [[File:Rover-top.png|thumbnail|A rover | + | | [[File:Rover-top.png|thumbnail|A rover controlled by the OKTO2 on top. The Navball is almost centered on the blue hemisphere. The "HDG" number suggest North, but this is just the direction that the terrain slants.]] || [[File:Rover-front.png|thumbnail|The same rover controlled by the OKTO2 mounted on the front via a Cubic Octagonal Strut. The "HDG" number is now showing the proper heading (East), and the Navball shows the correct roll and pitch.]] |
|} | |} | ||
| − | In a straightforward design, a rover will have an unmanned [[command module]] on top of a [[Probodobodyne RoveMate]] body. However, this typically means that the top of the probe's controller is pointing straight up. As a consequence the heading indicator and "HDG" number on the [[Navball]] will be meaningless while driving, except perhaps to indicate which side of the rover is currently the lowest. | + | In a straightforward design, a rover will have an unmanned [[command module]] on top of a [[Probodobodyne RoveMate]] body. However, this typically means that the top of the probe's controller is pointing straight up. As a consequence the heading indicator and "HDG" number on the [[Navball]] will be meaningless while driving, except perhaps to indicate which side of the rover is currently the lowest. The actual heading can sometimes still be estimated by imagining that you "pitch down" until the level indicator hits the horizon. (If the command module is rotated, you may have to substitute "pitch down" by "yaw left", "yaw right", or "pitch up".) |
| − | + | Alternatively you can get a proper indication of the heading, roll and pitch by pointing the top of the probe core in the forward driving direction. This is especially useful when using a rover to complete a survey contract, as the waypoints in the map view can be selected to make them visible on the Navball. | |
| + | |||
| + | <br clear="all"> | ||
== Gallery == | == Gallery == | ||
Revision as of 14:40, 3 January 2015
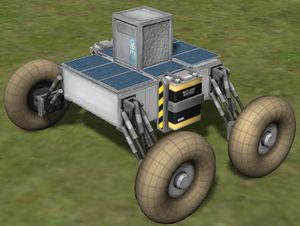
A rover is a vehicle equipped with wheels and some means of lateral propulsion (usually powered wheels) allowing it to move across terrestrial surfaces. Rovers can be driven everywhere except Kerbol and Jool, although they are difficult to operate in the extremely low gravity of small moons. The parts necessary to construct rovers were introduced with version 0.19.
Constructing rovers
Basics
For a vehicle to be classified as a rover, it must have at the very least a command module and some wheels. A source of electricity is strongly recommended as no command module has enough internal supply for more than a few minutes of driving. To allow the vehicle to drive straight, the wheels must be mounted parallel to each other in the VAB. While the rover is being driven, the wheels are smart enough to steer in directions matching the control inputs.
Wheels require lots of electricity to operate, so a rover should be equipped with plenty of energy. Batteries can power a rover for a time, but sustainable energy sources in form of solar panels or RTGs are required for a rover to operate indefinitely. Often solar panels are preferred due to their lower mass, but extended solar panels can easily be destroyed by atmospheric drag when on a fast-driving rover in an atmosphere.
When attaching multiple in-line wheels radially to a flat body, such as the Probodobodyne RoveMate, it is important to turn angle snap off in the construction menu. Otherwise, the wheels will not attach themselves properly at any point on the rover but the exact center and always point tangentially.
| Image | Part | Radial size | Cost ( |
Mass (t) |
Max. Temp. (K) |
Tolerance (m/s) |
Tolerance (g) |
Electricity (⚡/s) |
Max. Motor Speed (m/s) |
Brake Torque (kNm) |
|---|---|---|---|---|---|---|---|---|---|---|
| RoveMax Model S2 | Radial mounted | 300 | 0.05 | 1 200 | 20 | 20 | 1.0 | 12 | 0.34 | |
| RoveMax Model M1 | Radial mounted | 450 | 0.075 | 1 200 | 50 | 50 | 2.5 | 34 | 2 | |
| TR-2L Ruggedized Vehicular Wheel | Radial mounted | 760 | 0.105 | 1 200 | 100 | 80 | 3.5 | 58 | 3 | |
| RoveMax Model XL3 | Radial mounted | 1 200 | 1.25 | 1 200 | 150 | 200 | 5.0 | 15.5 | 30 |
Advanced
To be stable and easy to control, a rover should be relatively wide with a low center of mass. This makes it much harder for the rover to tip over when accelerating, braking, or turning at speed. Rovers become less stable as gravity decreases, so a rover which is perfectly stable driving around the KSC might be easy to flip on Minmus, for example. Another hazard of bodies with low gravity like Minmus is that rovers with a low mass might not exert enough pressure on their wheels to grip the ground and accelerate. One solution to this problem is to use upward-pointing RCS thrusters to push the rover into the surface.
Alternatively, rather than trying to avoid flipping entirely, a rover can be designed to right itself. On small rovers, retractable LT-1 Landing Struts can be used to turn them back over when they end up upside down. Larger rovers on low-gravity worlds can help themselves up by using RCS thrusters. Rovers can also turn themselves over with torque from reaction wheels or their command module.
The most complex rovers are practically small spacecraft, using rocket engines to deorbit and land themselves or even return themselves to orbit and carrying multiple kerbonauts or other large payloads.
Piloting rovers
Per default, a rover is controlled with the keys A, D, W and S. Unfortunately these keys also control vehicle rotation, which can make a rover completely uncontrollable on planets with low gravity. As a workaround for this problem, the rover controls can be remapped to different keys in the settings menu. If a number pad is available, a good solution is to map the WASD drive controls to 8456 on the numpad. Another solution is to switch into docking mode when controlling a rover.
Using docking controls, as opposed to staging controls, it is possible to quickly switch which keys control the translation and rotation. When the controls are in “ROT” mode the WASD controls rotate the rover, which can be switched with space. In the “LIN” mode the IJKL rotate and WASD translate, which is usually harmless for a rover. With a single click of the space button, pitching can be easily switch between on and off, therefore giving a stable mode of acceleration/direction change and a quick way to adjust the pitch of the rover on low gravity planets, should it be tipped or launched over a hill.
To prevent rovers from driving away when they are dropped, the parking brake (in the top-center HUD, bottom icon on the right) should be applied prior to the drop. While piloting the rover the “B” (default) can activate the brake, but after releasing the button the brakes will release too.
The most flimsy part of a rover are the wheels. When they experience strong impacts, they can get “broken”. In this state they are still intact as a part, but do not work as a wheel anymore. The impact threshold for this to happen is a lot lower than the actual impact tolerance listed in the parts menu. Wheels easily break when the rover jumps, so it is recommended to reduce the speed when the rover is driving over a hill. They can also break when they get faster than the maximum speed of the wheels, which can easily happen when it drives down a slope or uses rocket thrusters to accelerate a rover to higher speeds than it could reach with its wheels only. But it is possible to raise the speed at which the wheels break by reducing the weight pushing on the wheels, for example in atmosphere by using wings.
Fortunately, broken wheels can be fixed by kerbonauts on an EVA. When a kerbonaut is close to the damaged wheel, right-click it and click on "repair". The wheel will immediately be operational again. Usually the wheel jumps a bit which can damage the rover, especially if it is moving or very light.
In a straightforward design, a rover will have an unmanned command module on top of a Probodobodyne RoveMate body. However, this typically means that the top of the probe's controller is pointing straight up. As a consequence the heading indicator and "HDG" number on the Navball will be meaningless while driving, except perhaps to indicate which side of the rover is currently the lowest. The actual heading can sometimes still be estimated by imagining that you "pitch down" until the level indicator hits the horizon. (If the command module is rotated, you may have to substitute "pitch down" by "yaw left", "yaw right", or "pitch up".)
Alternatively you can get a proper indication of the heading, roll and pitch by pointing the top of the probe core in the forward driving direction. This is especially useful when using a rover to complete a survey contract, as the waypoints in the map view can be selected to make them visible on the Navball.
Gallery
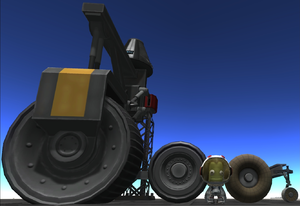
Modified rover from Rover + Skycrane with reusable lander in the background


