Getting Started/ja
| This page or section is in need of being brought up to date. Please help Kerbal Space Program Wiki by fixing inaccurate or outdated information. |
入門ページではKerbal Space Program初回プレイ数時間の助けとなるように作成されています。完全網羅とは行きませんが、基礎は理解できるはずです。
For an alternate walkthrough, including launching into orbit, see Tutorial: Walkthrough for Ye Compleat Beginner.
ゲームの概要・仕組みについてはゲームマニュアルを参照してください。
Contents
購入先
開発メーカーSquadはKSPを簡単に購入できる販路を用意しています。
- 公式ページ http://kerbalspaceprogram.com へアクセス。
- "store"をクリックしたら、商品一覧の中にある“Kerbal Space Program”がソフト本体になります。“Kerbalizer”というのも隣にありますが、今は必要ありません。
またゲーム販売サービスSteamを利用している方はそちらからも購入できます。その他いくつかの小規模販売サービスでも取り扱いがあります。
ダウンロード
Currently, the entirety of the current version of Kerbal Space Program is downloaded at once. There are plans for a Patcher, Steam版は自動でアップデートされます。
- 公式ページに行く。
- ユーザー名とパスワードを入れてLoginボタンを押す。
- Profileボタンをクリック。
- ページ下までスクロールし、purchase invoiceの隣にあるダウンロードリンクをクリック。
- OSプラットフォームに合わせて専用バージョンをダウンロードしてください。
- Macの場合:
- Install Mono from the bundled .dmg file, if needed.
- Unzip the file into an empty folder.
- Ensure the execute permission is set on the Patcher.command file.
- Windowsの場合:
- .NET Framework 4.0以降が必要なので必要な場合はインストールしてください。(Vista・7はちゃんと更新していれば入ってます。8以降は標準で4.5が入ってます。)
- システムフォルダ以外で新規作成したフォルダ内に解凍して下さい。解凍には7-zipなどを使ってください。
- Linuxの場合:
- 当wiki編集者にLinuxでのKSPプレイヤーはいません。情報提供お願いします。Linux-users help you.[1]
- Macの場合:
ゲームの起動
Run the game after installing it by browsing to the folder into which the game was unpacked in and running KSP.exe (KSP.app on OSX, KSP.x86_64 or KSP.x86 on Linux depending on whether you wish to the run the 64 or 32bit versions). A shortcut can be made on the Desktop to this file to speed opening the game but is unnecessary if you want to run KSP from a USB drive to carry all of your game information with you for playing on any computer.
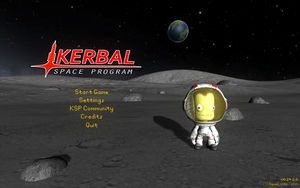
タイトル画面には以下の項目があります:
- Start Game
- Settings (設定。グラフィック設定はこの先にあります。)
- KSP Community (webブラウザでコミュニティサイトを開く。)
- Credits (スタッフロール。)
- Quit (ゲーム終了)
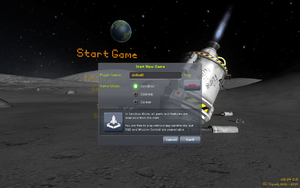
"Start Game"を選択すると、"Start Game"メニュー画面が出ます。
"Start Game"メニューには以下の項目があります:
- Resune Game (ロードゲーム。)
- Start New (ニューゲーム。)
- Training (チュートリアル。説明は英語です。)
- Scenarios (シナリオモード。与えられた機体で目標を達成するモードです。)
- Back (タイトル画面に戻る。)
ここでは"Start New"を選択してください。
当ページではSandboxモードを基に説明を進めていきます。Scienceモード、Careerモードについては各ページを確認してください。プレイヤー名は'default'のままでも構いませんのでお好きなものを付けてください。さあゲームを始めましょう!
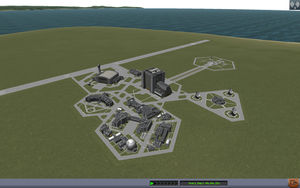
ゲームが始まるとSpace Center(宇宙センター)画面になります。
Kerbal Space Centerには以下の施設があります。:
- Vehicle Assembly Building(VAB) - ロケット組立棟。真上に飛ぶ宇宙船を組み立てる施設です。
- Spaceplane Hangar(SPH) - 航空機組立棟。滑走路を走って飛び上がる宇宙船を組み立てる施設です。
- Tracking Station - 追跡ステーション。飛行中の機体に戻ったりスペースデブリの管理をする施設です。
- Astronaut Complex - 宇宙飛行士総合センター。宇宙飛行士となる緑の雇用と管理をする施設です。
- Flagpole - 旗竿。団体旗の変更が出来ます。
- Launch pad - ロケット発射台。VABで作成した機体の出発地点です。
- Runway - 滑走路。SPHで作成した機体の出発地点です。着陸にも使えます。
- Research and Development - 研究開発施設。Scienceポイントを使って新パーツの開発を行います。(Sandboxモードでは利用できません。)
- Mission Control - 発射管制棟。契約依頼の管理を行う施設です。(Careerモードでのみ利用できます。)
各施設にはクリックで入ることが出来ます。
ロケットをつくろう!
それではこのゲームの基本、ロケット作りから説明していきます。中央のVehicle Assembly Building(VAB)をクリックしてください。この項では見本ロケットを使って説明していきます。
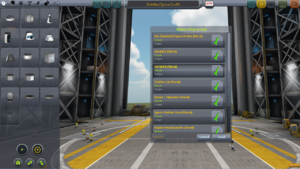
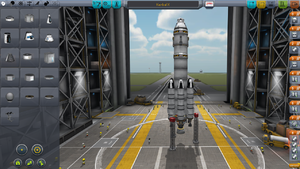
Loadボタン![]() を押すと上図のようなウィンドウが開きます。"Kerbal X (stock)"という機体データが初めから入っているのでロードしてください。このロケットはとても単純な構造で簡単に周回軌道に到達することができます。 If you are using the demo version, Here is a simple rocket that can achieve orbit with more than enough fuel for returning to the planet.
を押すと上図のようなウィンドウが開きます。"Kerbal X (stock)"という機体データが初めから入っているのでロードしてください。このロケットはとても単純な構造で簡単に周回軌道に到達することができます。 If you are using the demo version, Here is a simple rocket that can achieve orbit with more than enough fuel for returning to the planet.
この機体を使って大まかな仕組みを説明します。画面右側の0~8まである数字はstage(ステージ)と言います。現実のロケットで指す「ステージ・段」とは異なり、ゲーム内のステージは同時に作動させるパーツのグループのことを指します。spaceキーを押すたびに数字の大きいステージから順に作動します。各ステージには一つ以上のパーツが属しており、それぞれのパーツを示すアイコンが表示されています。
Kerbal Xのステージ設定と操作タイミングは以下のようになっています。:
- 第8ステージ
- 7基(大型1基、補助6基)の液体燃料エンジンを始動。
- エンジン点火。発射台支柱と繋がっているのでまだ離陸はしません。
- 7基(大型1基、補助6基)の液体燃料エンジンを始動。
- 第7ステージ
- TT18-A Launch Stability Enhancer支柱切り離し。
- ロケット発射。エンジン点火後、推力が上がったら速やかに作動させます。
- TT18-A Launch Stability Enhancer支柱切り離し。
- 第6ステージ
- 最初に燃焼終了した補助ロケット2基の切り離し。
- 補助ロケット6基のうち2基の燃料が先に無くなります。2基が停止したら作動させます。
- 燃料切れのタイミングはエンジンの燃焼音や、噴射炎、残量表示で確認できます。
- 最初に燃焼終了した補助ロケット2基の切り離し。
- 第5ステージ
- 次に燃焼終了した補助ロケット2基の切り離し。
- 最初の2基に遅れて次の2基が燃料切れになります。第6ステージと同じ要領で作動させます。
- 次に燃焼終了した補助ロケット2基の切り離し。
- 第4ステージ
- 最後に燃焼終了した補助ロケット2基の切り離し。
- 残り2基の燃料もやがて尽きます。同じ要領で作動させます。
- 最後に燃焼終了した補助ロケット2基の切り離し。
- 第3ステージ
- 主力エンジンの切り離し。
- 主力エンジンの燃料が尽きたら作動させます。現実のロケットではここで分離する所を「第1ステージ」と言います。
- 主力エンジンの切り離し。
- 第2ステージ
- より小型の第2段エンジンの始動。
- 第1ステージ
- 第2段エンジン切り離し。
- 落下し始めたら作動させます。
- 第2段エンジン切り離し。
- 第0ステージ
- パラシュート展開。
このように画面右のパーツアイコンは下から順に見ていくことになります。Kerbal X Rocketはこのままでも十分飛ぶことが出来ますが、初心者でも思いどおりに飛ばせるように少しだけパーツを足しましょう。
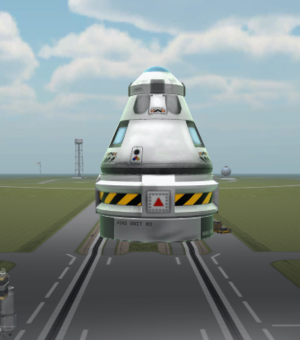
まずパーツを間に差し込むため、上図を参考にロケットを分解しましょう。まずは分離装置(警戒色模様と赤三角のついたリング)のすぐ下の燃料タンクをクリックします。これで選択した燃料タンクに繋がったすべてのパーツをまとめて移動できるので、少しずらした所で再度クリックしてください。これがパーツ移動の基本となります。もし取り外したパーツが不要な場合はパーツを選択した後、画面左側のパーツウィンドウ内で再度クリックすることで削除することが出来ます。
準備が出来たのでパーツを追加していきましょう。1つ目はSAS(安定増大装置)です。このパーツを追加することでロケットの自動姿勢維持と手動方向転換が非常に楽になります。ロケット発射台に移動してからTキーを押すと自動姿勢維持の作動します。それではパーツを取り付けましょう。
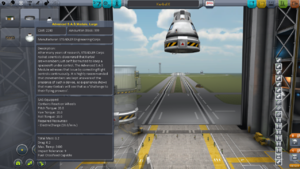
画面左上のパーツタブを"Control"(制御)に切り替え、Advanced S.A.S Module, Largeをクリックしてください。選択したSASパーツがマウスカーソルに付いてくるので上図を参考に分離装置の下まで移動してください。パーツが緑色に光ったらその位置でクリックすると取り付けが完了します。これがパーツ取り付けの基礎で、繰り返すことによってパーツを積み上げていくことが出来ます。
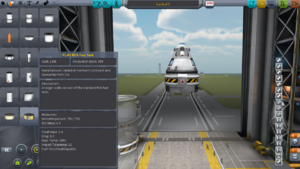
次にもう一つの姿勢制御パーツ、RCS(姿勢制御システム)も追加しましょう。SASが電力を消費するのに対してRCSは燃料を消費して姿勢制御を行う装置です。RCSでの自動姿勢維持はロケット発射台に移動してからRキーを押すと作動します。それではSASとおなじ要領でRCS燃料タンクを追加しましょう。パーツタブを"Propulsion"(推進)に切り替えFL-R1 RCS Fuel Tankを選択し取り付けます。
RCSを機能させるためにはスラスター(噴射口)も必要です。パーツタブを"Control"に切り替えRV-105 RCS Thruster Blockを取り付けます。このスラスターの場合、船体側面の4箇所に設置する必要がありますが、対称的に同一パーツを取り付ける場合は画面左下の"Symmetry Mode"(対称性モード)を切り替えます。下図を参考に4回対称になるまでアイコンをクリック(またはXキー)してください。
最初に外しておいたパーツをつなげ直して改修完了です。早速打ち上げましょう。画面右上にある緑色の"Launch"(発進)ボタン![]() を押してください。
を押してください。
ロケット発射
"Launch"ボタンを押すと発射台に移動します。
ロケットの操縦は「簡単に」とは行きません。WSADで機体の傾き操作、QEで回転操作ですが、機体が回転すると傾き操作の向きもあわせて変わるので注意が必要です。一番簡単な方法は画面下中央のnavball(姿勢指示器)を見て傾き操作することです。
打ち上げる前にMキーを押してOrbital mapを確認しておきましょう。画面にはKerbin星が映し出されています。スクロールするとKerbinの月が、さらにスクロールすると惑星系まで見えてきます。Kerbinの重力圏を離れこれらの天体に向かうには、ロケット設計や打ち上げの経験を積みながら方法を模索する時間が必要でしょう。
それでは打ち上げ手順に入ります。最初に左⇧ Shiftキーを押してスロットルを開きます。次にTキーを忘れずに押してSASを作動させてください。SAS作動を忘れると自動姿勢維持が行われず、ロケットがどんどんあらぬ方向に飛んでいってしまいます。SASの効果でロケットの操舵(WSADQE)がすばやく行えるはずです。また推力偏向(これもいずれ説明します)の効果で狙った角度を微調整なしに維持できるはずです。spaceでエンジン点火、すばやくもう一度spaceで支柱を切り離し離陸します。
燃料が切れたパーツが発生するたびにSpaceキーを押して次のステージを作動させてください。
おさらいすると、発射台に移動したらTを押す、左⇧ Shiftでスロットル全開、spaceでエンジン点火、もう一度spaceで離陸です。
You can also imitate the real-life launches, execute a slow gravity turn. The main point the gravity turn is the engines can spend all of their thrust to increase the speed and fight against the gravity and drag, turning of velocity vector (this is basically a wasted work) made by gravity on a trajectory minimalizes the loss by aerodynamic drag and gravity. It saves a lot of fuel during ascent. As I mentioned, the rocket always flies towards the heading - this direction called prograde and signed on the navball by this mark: ![]() . The first step is ascending vertically, at altitude of 2 kms pitch over to a vertical angle of 1-2 degrees to east (this is called pitchover maneuver), and after this maneuver just slowly, gently and continuously increase the angle following the prograd mark, while keeping a heading of 90 degrees east, but do give greater tilt over 10-15° until reach 10 km. At this altitude you can pitch to a vertical angle of 45 degrees (slowly, gently and continuously), over 20 km altitude increase the tilt over 65-75 degrees, and tilt on until a the heading differs to horizontal only some degrees at 40 kms altitude. And keep an eye on the apoapsis (marked with "Ap" on the map), and turn off the throttle left-^ Control if reached 70 km - this needs speed of 2200-2400 m/s relative to surface (or 2025-2225 m/s relative to orbit (see: Point of reference) on a right trajectory, but less is enough on less efficient steeper trajectory). Remember: the too shallow trajectory wastes the fuel for drag, the too steep for the gravity.
. The first step is ascending vertically, at altitude of 2 kms pitch over to a vertical angle of 1-2 degrees to east (this is called pitchover maneuver), and after this maneuver just slowly, gently and continuously increase the angle following the prograd mark, while keeping a heading of 90 degrees east, but do give greater tilt over 10-15° until reach 10 km. At this altitude you can pitch to a vertical angle of 45 degrees (slowly, gently and continuously), over 20 km altitude increase the tilt over 65-75 degrees, and tilt on until a the heading differs to horizontal only some degrees at 40 kms altitude. And keep an eye on the apoapsis (marked with "Ap" on the map), and turn off the throttle left-^ Control if reached 70 km - this needs speed of 2200-2400 m/s relative to surface (or 2025-2225 m/s relative to orbit (see: Point of reference) on a right trajectory, but less is enough on less efficient steeper trajectory). Remember: the too shallow trajectory wastes the fuel for drag, the too steep for the gravity.
If this seems too complicated, try a simplified (and not so efficient) recipe: start "gravity turn" at 10 km and pitch over to a vertical angle of 45 degrees, while keeping a heading of 90 degrees east. While your apoapsis is 50 km, pitch over to 30 degrees. As said above monitor your apoapsis in the map to time your engine stop and wait until 10 seconds before apoapsis to start burning.
軌道投入
It's time learn more about your rocket. The parts editor in the VAB is simple enough to use, but if I were you I would stay away from spaceplanes for a little while longer.
You already know a little bit about staging, but I'm going to generalize it even more for you.
The launching stage
Here you have a whole bunch of high powered engines and large fuel tanks, Solid rocket boosters are most often used here. The motto here is pack as much of it on as you can because you're not taking it with you.
If you do not already know, you can mount things radially (on the side) of other things, and by the magic of the symmetry button (Bottom of the parts menu) you can have the radially mounted things not make your poor rocket tip over.
Staging is one of the most important aspects of building a rocket. I still use staging, even though a lot of people have quickly traded it out for action groups. On the right there is a tall bar with everything in its respective stage, however if you were to put half your rockets in one stage and the other half in another, you would go almost 3 times as far, in twice the time!
The other stages
Generally split into a circularization stage (I totally didn't make that word up), and an interplanetary stage. For now all you really need to know is everything after the stages in the atmosphere should be light, with medium to low power. Once you're out, if you're going into orbit all you need is a LV-N, 909 or a Poodle, depending on your preference.
Orbiting and reentry
Remember when I told you how to open the map? That's going to come in handy here. Your map also shows your orbital details, so what you need to do is burn just about directly up with your launcher stage. This may take a while, and I encourage you NOT to use the physics warp as with most rockets if you are burning as using the physics warp will almost always make you veer wildly off course or explode in midair. Once your apoapsis (displayed on the map) is above about 70 km, press X or hold control to turn off your throttle. Turn off SAS and aim your rocket so it is facing sideways. On the navball the marker indicating your direction should be right on the border between blue and brown. Turn SAS back on and time warp (slowly) until your rocket is about 1 km below your apoapsis, then start burning. On the map your orbit should get wider and wider (you can bring up your navball on the map and keep steering, and see your fuel on the map by pressing F2 twice), and once it gets wide enough your periapsis (marked with "Pe" on the map) will pop out of the ground, see its shadow and go scampering off into space. Once your apoapsis and periapsis are both above 70 km, you can rest and look at your work. Then you can start thinking "Great, I have a piece of junk in orbit of my planet."
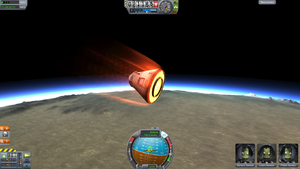
To reenter Kerbin, you need to burn retrograde. That sounds fancy, but if you have enough fuel just turn your rocket until you see the yellow circle with the small yellow lines in the middle: ![]() . Point directly at it and burn. You do not have to aim the landing site, even not the ground, because the atmospheric drag modifies the trajectory. It is enough to lower the periapsis of a low circular orbit to 35-40 km. This altitude ensures effective aerobraking, but avoids the damage of the craft. If you still have usable engine, you can correct your trajectory for more preferable landing site. You can deploy your parachute after decoupling your last stage. The parachute can semi-deploy at altitude of 22 km - in this state it works as drogue chute - and fully deploy 500 m above the ground by default, and if you made your top stage light enough it will almost completely stop you before you hit the ground. It is worth to open the chute far before the full deployment altitude, because the semi-deployed chute still effectively lowers the speed. If your returning unit is too fast and too heavy, the suddenly full-deploying parachute will rip off and your kerbals will fall to the ground, exploding upon impact. If the parachute has already opened and your capsule descending slowly, just wait for reaching the surface. If the capsule landed on ground or splashed-down, move your mouse on the altimeter in top-center on the screen and click on the popped down green RECOVER VESSEL button to recover the pod. Congratulations, you have successfully finished your first space mission!
. Point directly at it and burn. You do not have to aim the landing site, even not the ground, because the atmospheric drag modifies the trajectory. It is enough to lower the periapsis of a low circular orbit to 35-40 km. This altitude ensures effective aerobraking, but avoids the damage of the craft. If you still have usable engine, you can correct your trajectory for more preferable landing site. You can deploy your parachute after decoupling your last stage. The parachute can semi-deploy at altitude of 22 km - in this state it works as drogue chute - and fully deploy 500 m above the ground by default, and if you made your top stage light enough it will almost completely stop you before you hit the ground. It is worth to open the chute far before the full deployment altitude, because the semi-deployed chute still effectively lowers the speed. If your returning unit is too fast and too heavy, the suddenly full-deploying parachute will rip off and your kerbals will fall to the ground, exploding upon impact. If the parachute has already opened and your capsule descending slowly, just wait for reaching the surface. If the capsule landed on ground or splashed-down, move your mouse on the altimeter in top-center on the screen and click on the popped down green RECOVER VESSEL button to recover the pod. Congratulations, you have successfully finished your first space mission!
- If you can do the previous simple mission (launch-getting to orbit-returning) confidently with a default Kerbal-X (or an own self-made rocket), it is the high time to move to the tutorials page where you may find many secrets of ship-building, mission planing and maneuvering.
Notes
- ↑ http:////forum.kerbalspaceprogram.com/threads/24529-The-Linux-compatibility-thread!?highlight=linux+compatibility/ The-Linux-compatibility-thread
